DIY: Desktop PC Using Shuttle DS81 Barebone PC System
I needed to run a 64-bit Virtual Machine on my laptop when I found out that it did not support virtualization even though it had a 64-bit CPU. That got me started on acquiring a new PC. I decided that I wanted a mid-to-high-end PC -- not quite a high-end gaming PC -- but one with sufficient horsepower to be able to run multi-threaded applications with ease. I settled on the following minimum configuration: a 64-bit CPU with hardware support for virtualization, 8GB RAM, and 256GB hard drive. Superior graphics performance was not on my list of must-haves.
A search online revealed that the minimum-configuration PCs were priced upwards of $600. The prices seemed high, the desktop PCs looked bulky, and the laptop screens were tiny. It was then that I decided to build a desktop PC, a first for me. The project would be a fun, learning experience. And it would put to good use some spare PC hardware in my garage, and maybe even save me some money.
Barebone PC System
I started the project by going online and searching for desktop PC parts. During the search I stumbled upon what are referred to as barebone PC kits. In general, these kits come with the PC motherboard installed in a case and include the power supply and cooling fans. The DIYer supplies the CPU, hard-drive, RAM, and any other parts such as graphics card, CD/DVD drive, etc.
I wanted a small form factor for my desktop PC and after a brief search online settled on the Shuttle DS81 PC Barebone System. It's support for 4th generation Intel i3, i5, or i7 processors, the many ports (USB, SATA, HDMI, etc.), and a surprisingly small form factor for the punch it claimed to deliver were the main technical factors that influenced my selection. And it helped that there were many positive and a few highly informative reviews on Amazon for that product. The DS81 product specifications document contains a detailed list of features. Table 1 below is an excerpt from the DS81 features contained in the spec.
Table 1. A few features of Shuttle DS81 PC Barebone System
| Item | Details |
|---|---|
| Chassis | 1.35 L (19 x 16.5 x 4.3 cm) |
| Drive Bays | 1x 2.5" supports hard disk or SSD |
| CPU Support | Socket LGA 1150 Supports Core i7/i5/i3, Pentium, Celeron Supports Haswell TDP max. 65W |
| BIOS | AMI BIOS, Watchdog, Power fail resume |
| Memory | 2x DDR3-1333/1600 SO-DIMM, max. 2x8GB |
| Expansion slots | 1x Mini-PCIe (supports mSATA 3G), supports half-size and full-size, 1x Full-size mSATA (supports SATA 6G), 1x Mini-PCIe half-size (supports WLAN kit) |
| Front panel | Power button, Power LED & HDD LED, 4x USB 2.0, SD card reader, Head phone & Microphone |
| Back panel | HDMI + 2x DisplayPort (DP), 2x USB 3.0 + 2x USB 2.0, 2x Gigabit LAN, RS232 + RS232/422/485, 2x Kensington Lock, Optional WLAN (2 antennas), 4-pin connector supports, power button, clear CMOS, +5VDC |
| Onboard Connectors | 1x SATA 6G, 1x SATA 3G, 1x USB 2.0, 1x VGA (analog video output), Clear CMOS jumper, LPC, 2x10 pin (2mm Pitch), Always-on-Jumper |
| Power supply | 90W external |
| Accessory | 1x SATA data/power cable (preinstalled), VESA mount (PV04), optional: WLAN kit (WLN-S), VGA port (PVG01) |
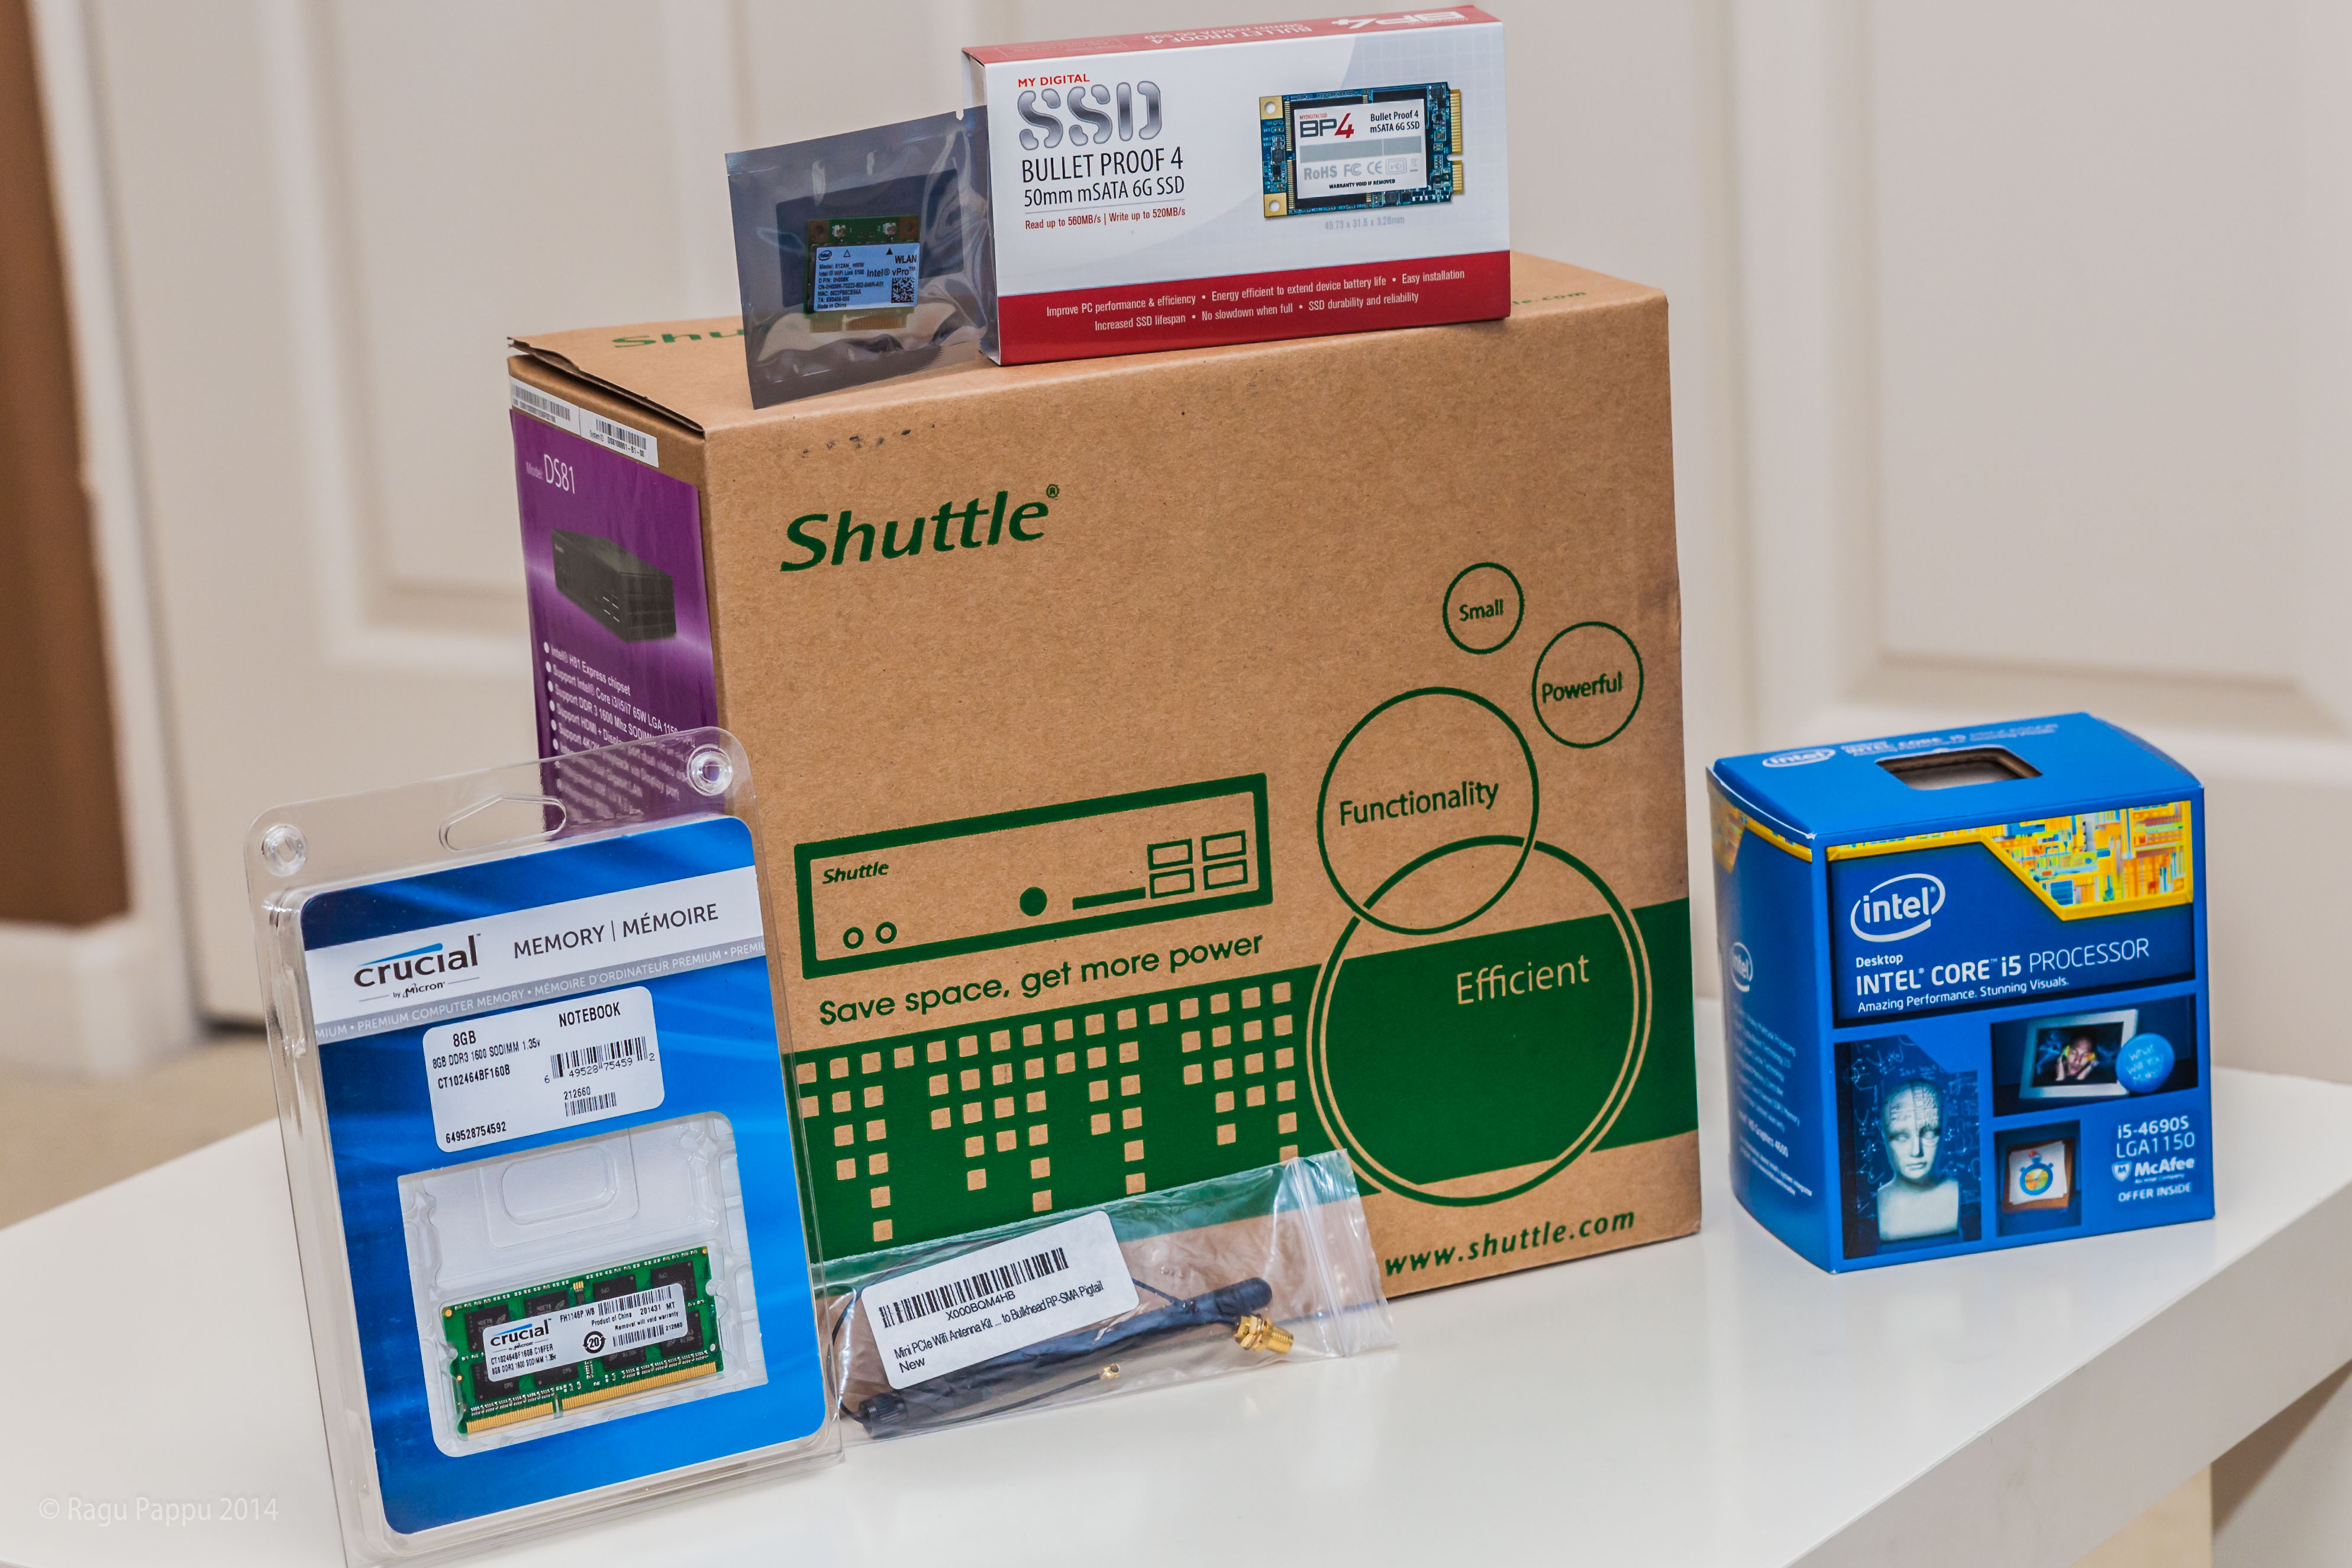
Desktop PC Parts
After selecting the Shuttle DS81 system I selected the internal parts of the desktop PC: the CPU, the storage, and RAM.
CPU
The DS81 is a PC that uses Intel desktop processors, so the CPU had to be an Intel processor, of course, but there were two other aspects to consider when selecting the CPU -- Speed Rating and Power Dissipation. For speed, I wanted a fast (but not necessarily a top-of-the-line) CPU. For power dissipation, the CPU maximum TDP (Thermal Design Power) had to be no greater than 65W, a limit imposed by the DS81 spec.
The Intel Core Desktop CPU devices come in a few flavors, each flavor identified by an alpha suffix in the processor name, and each flavor optimized for one metric such as, graphics performance, or clocking speed, or power, etc. I selected the performance-optimized Intel Core i5-4690S CPU based on a performance-price tradeoff. It has a speed rating of 7619 at 3.20GHz, and max TDP of 65W.
Storage
The DS81 has a storage bay for a 2.5" hard disk or an SSD. But it also has a full-size PCIe expansion slot that can support an mSATA 6 Gbps drive. I selected MyDigitalSSD 256GB as the internal storage device, the one from which the PC normally boots up. The MyDigitalSSD package even includes a small screw and a 1.4mm screwdriver! I selected the SSD for its high data transfer speed and less generated heat compared to a hard disk drive. The SSD capacity is modest at 256GB but because the DS81 has several USB ports and high storage capacity external hard drives are relatively inexpensive I could, if needed, easily add more storage in the future. I could also add an internal hard drive or SSD since the storage bay is now unused.
RAM
The DS81 can support a maximum of 16 GB of RAM (2 x 8GB). I selected Crucial 8GB Single DDR3 RAM. The single module would leave the second DS81 RAM slot empty and allow adding 8GB RAM in the future.
Wireless LAN
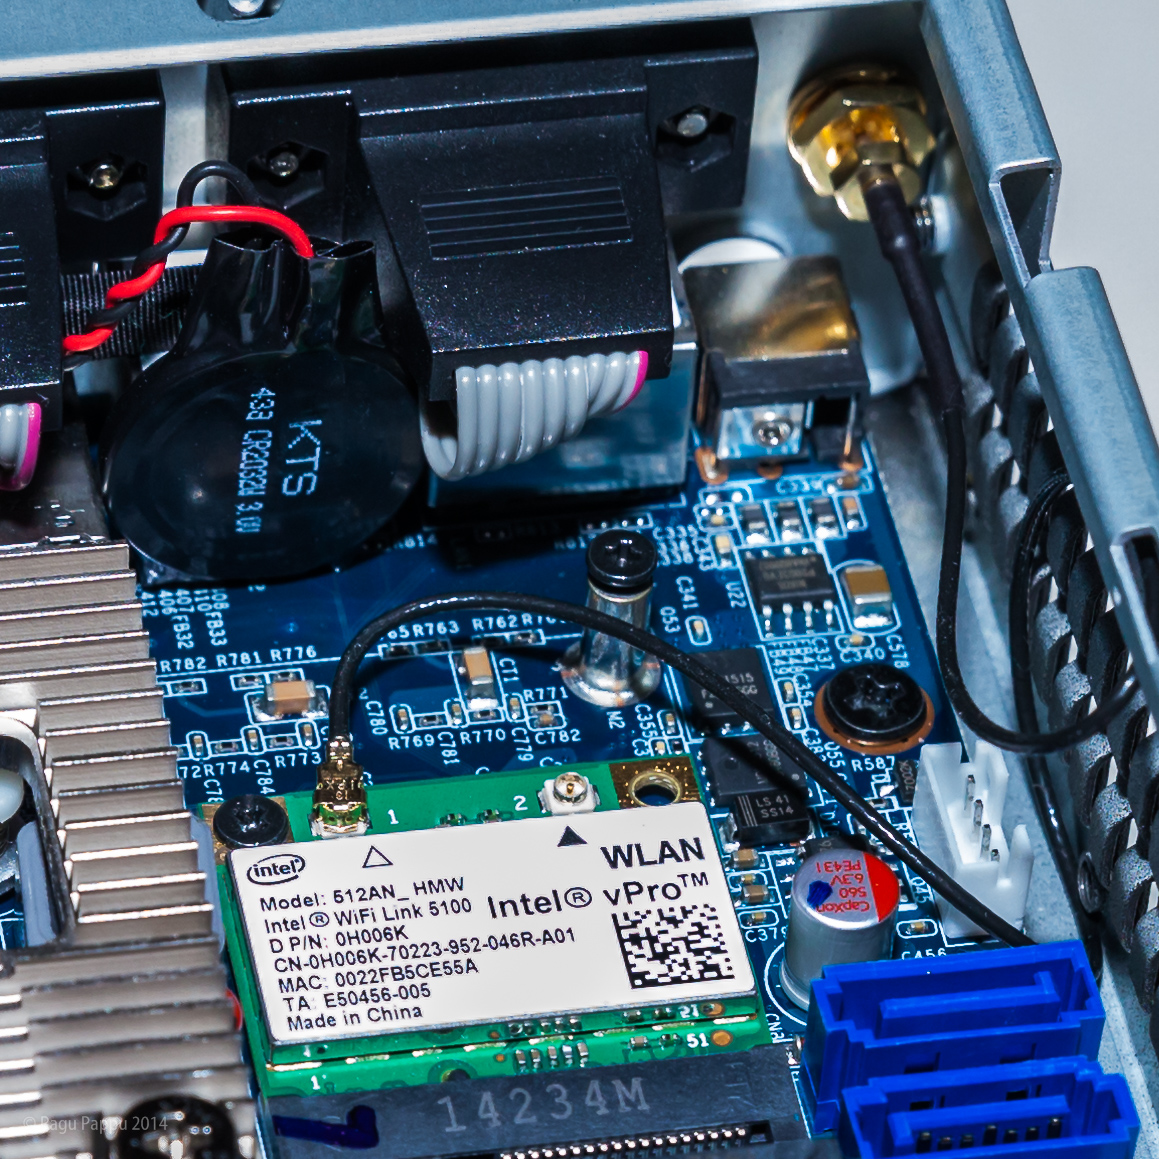
There is no wired networking capability near where I wanted to set up the desktop PC, and because the DS81 does not natively provide wireless networking capability, a wireless LAN card was necessary. I selected the Intel WiFi Link 5100 Half Size Wirless MINI PCIe Card. This card would fit into the DS81 half-size PCIe expansion slot. I also selected a Mini PCIe Wifi Antenna kit to go with the wireless LAN card.

Miscellaneous Parts
I already had a Logitech Wireless Keyboard and Mouse set and a 21" Samsung monitor so I did not need to newly purchase those PC parts.
The DS81 provides audio output via the HDMI and DisplayPorts, and also via a headphone jack on the front panel. I selected a pair of USB powered speakers by AmazonBasics.
The full list of parts acquired for this desktop and the cost of each part are listed in Table 2 below. The total cost of this desktop came out to $697.52.
Table 2. Desktop PC Parts and Costs
-
No.
Part Name
Cost
1
SHUTTLE DS81 LGA1150/Intel H81/ DDR3/ SATA3&USB3.0/ A&V&2GbE/ 90W Slim PC Barebone System, DS81 192.99
2
MyDigitalSSD 256GB (240GB) 50mm Bullet Proof 4 BP4 50mm mSATA Solid State Drive SSD SATA III 6G - MDMS-BP4-240 119.95
3
Intel Core i5-4690S LGA 1150 - BX80646I54690S 219.29
4
Crucial 8GB Single DDR3 1600 MT/s (PC3-12800) CL11 SODIMM 204-Pin 1.35V/1.5V Notebook Memory CT102464BF160B 72.49
5
Intel WiFi Link 5100 Half Size Wirless MINI PCI-E Card 512AN_MMW 802.11a/b/g/n 2.4GHz and 5.0GHz 300 Mbps 9.19
6
Mini PCIe Wifi Antenna Kit 3Dbi RP-SMA Antenna + 20cm U.fl/IPEX to Bulkhead RP-SMA Pigtail 7.65
7
AmazonBasics USB Powered Computer Speakers (A100) 13.99
Total
635.55
Local Taxes at 9.75%
61.97
Grand Total
697.52
Assembling the PC
I used these tools during assembly:
- Phillips head screwdriver #2
- An old (expired) plastic credit card
- A few tissue papers
- A "flat-blade" 1/4" screwdriver
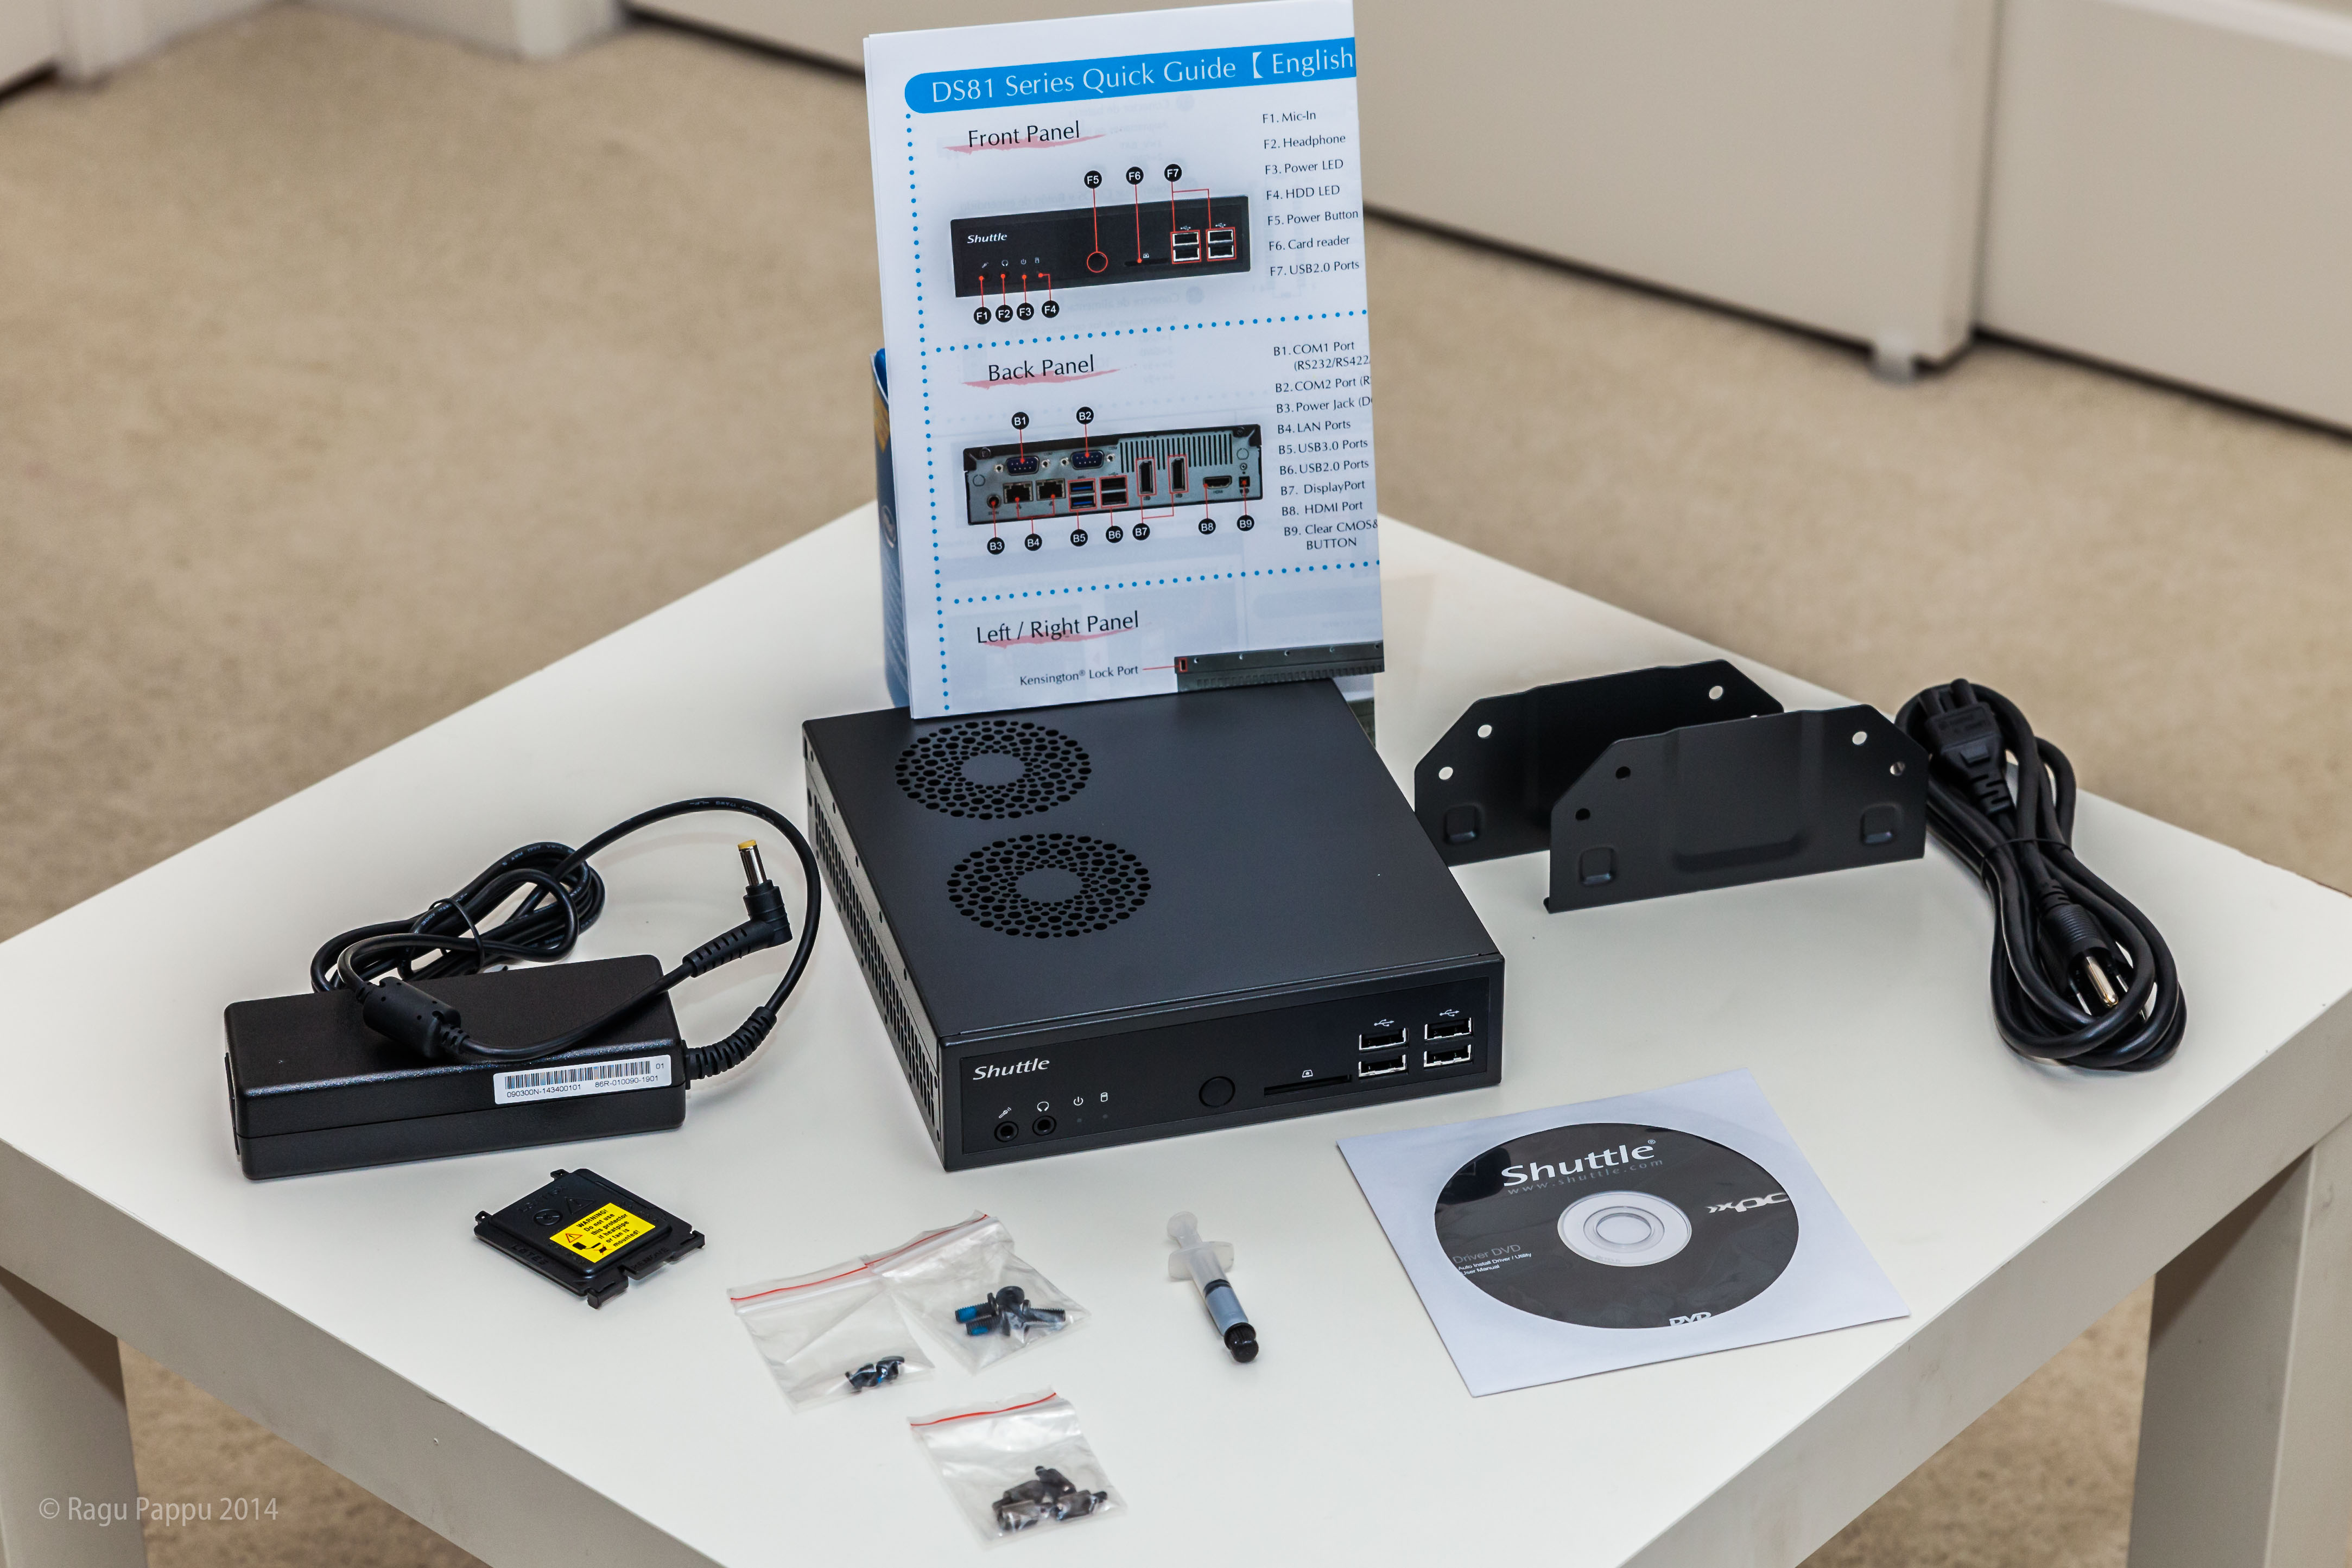
The Shuttle DS81 package comes with a DS81 Series Quick Guide that identifies various parts of the DS81 box and the parts on the motherboard, and also contains detailed, illustrated installation instructions. Assembling the PC was simply a matter of following the instructions carefully. I installed parts in the following order: the CPU unit, the RAM module, the Wireless LAN card, and finally, the SSD.
The DS81 comes with cooling fans, so the cooling fan unit that came in the Intel CPU package was not used.
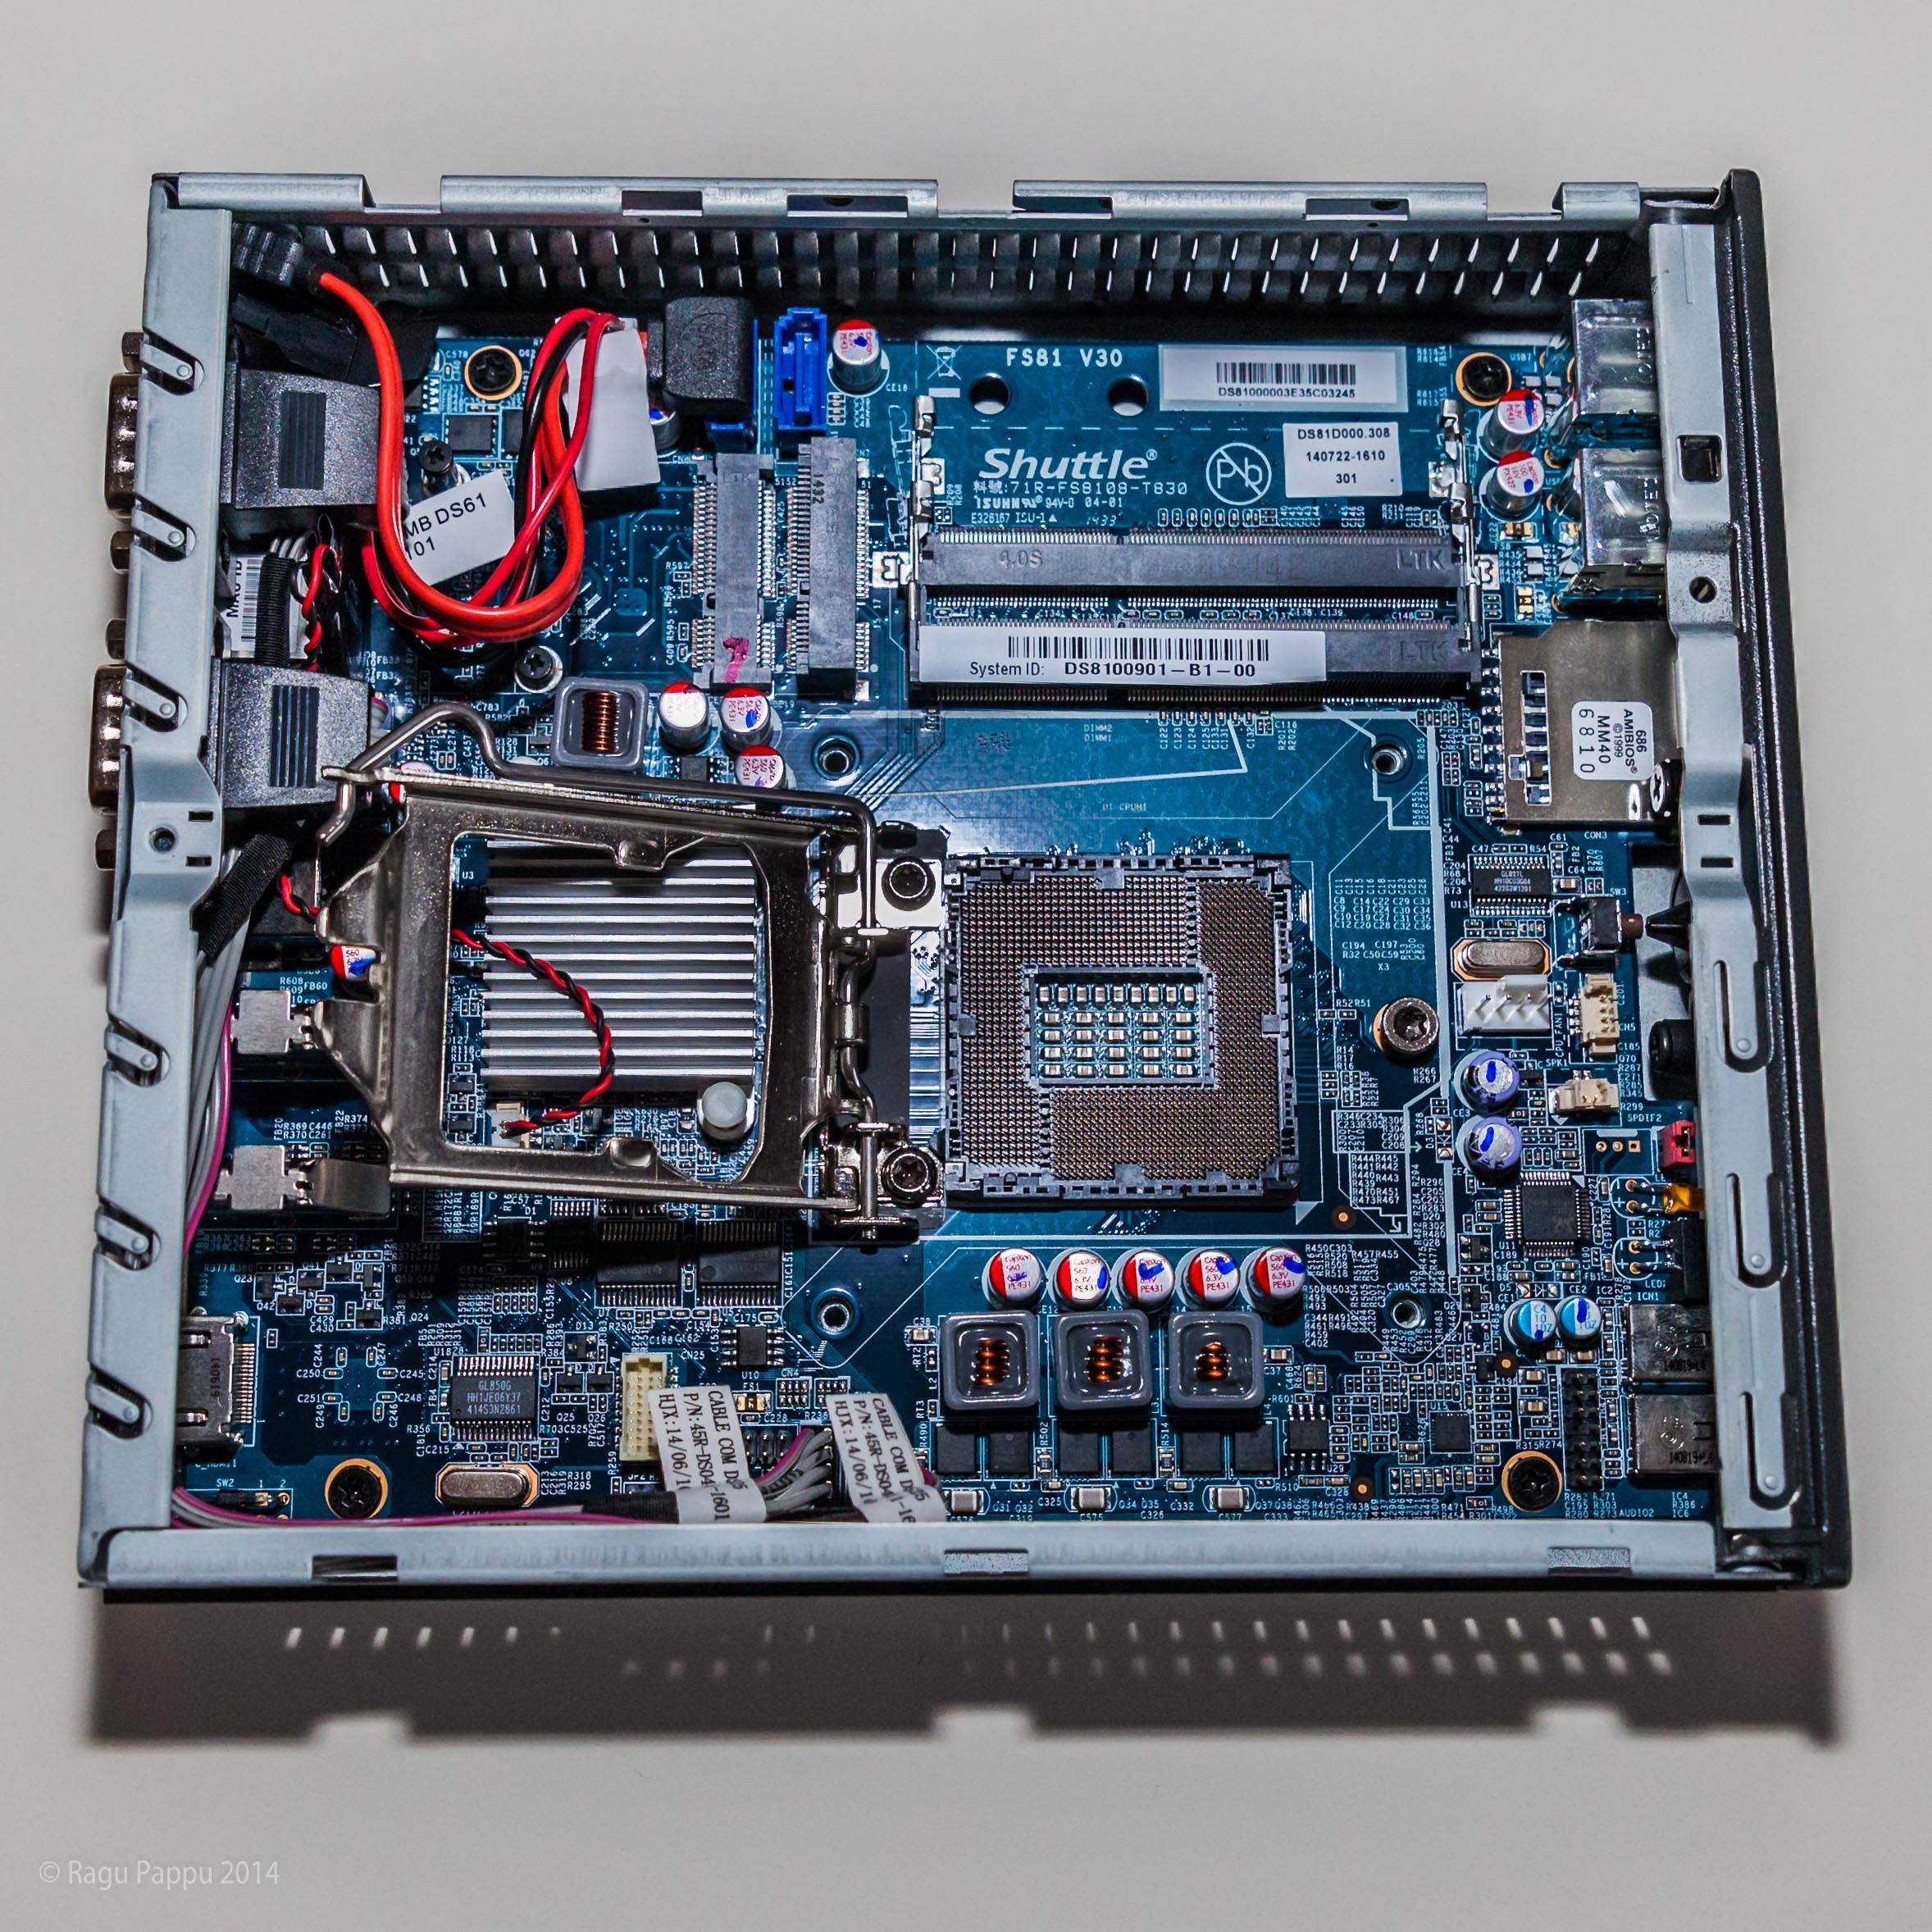
I started installation by removing the chassis cover, then the rack (on which the internal hard drive, if installed, is mounted) and then the ICE module attachment, which revealed the CPU socket. After locking the Intel i5-4690S CPU chip in the socket I injected thermal paste in the syringe onto the chip, starting in the middle of the chip and drawing a spiral outward. About three-quarters of the paste in the syringe was more than sufficient to cover most of the CPU chip. Next, using an old credit card I spread the paste over the CPU to form a uniform layer, wiping away excess paste accumulating on the credit card as I continued to even out the paste. The Quick Guide has this warning:
Please do not apply excess amount of thermal paste.
And I made sure that the layer of thermal paste was not too thick (I reckon the layer was about 0.2mm thick). I also took care to not let the paste spill over the sides of the chip.
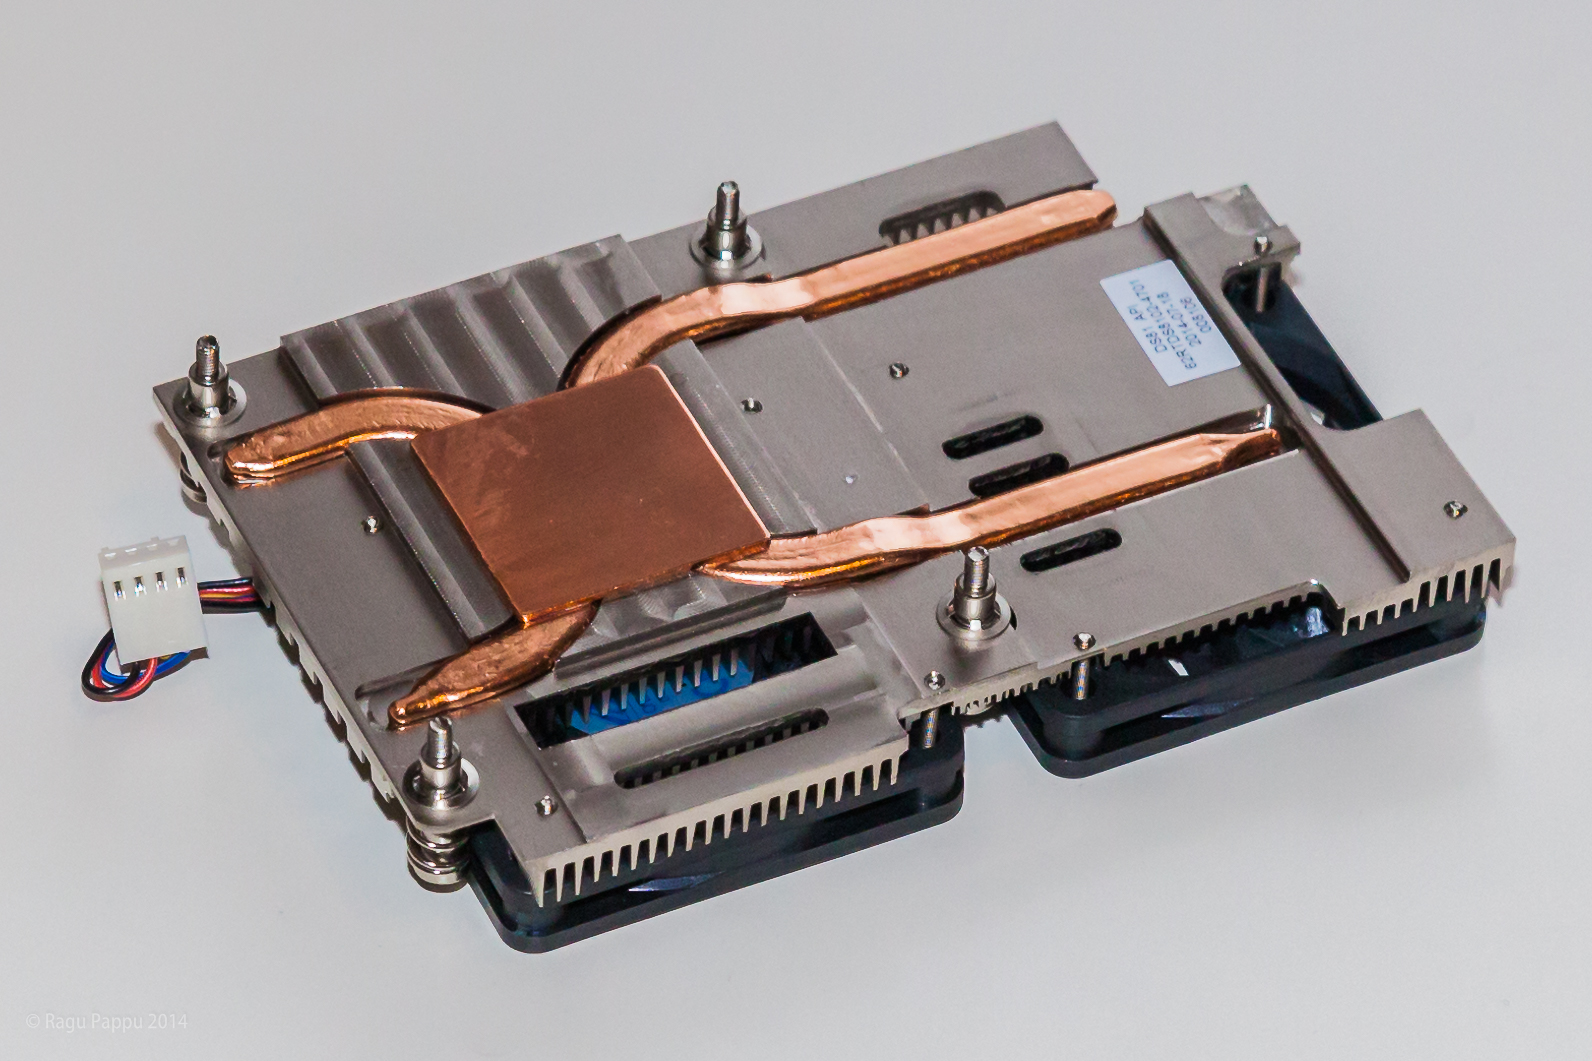
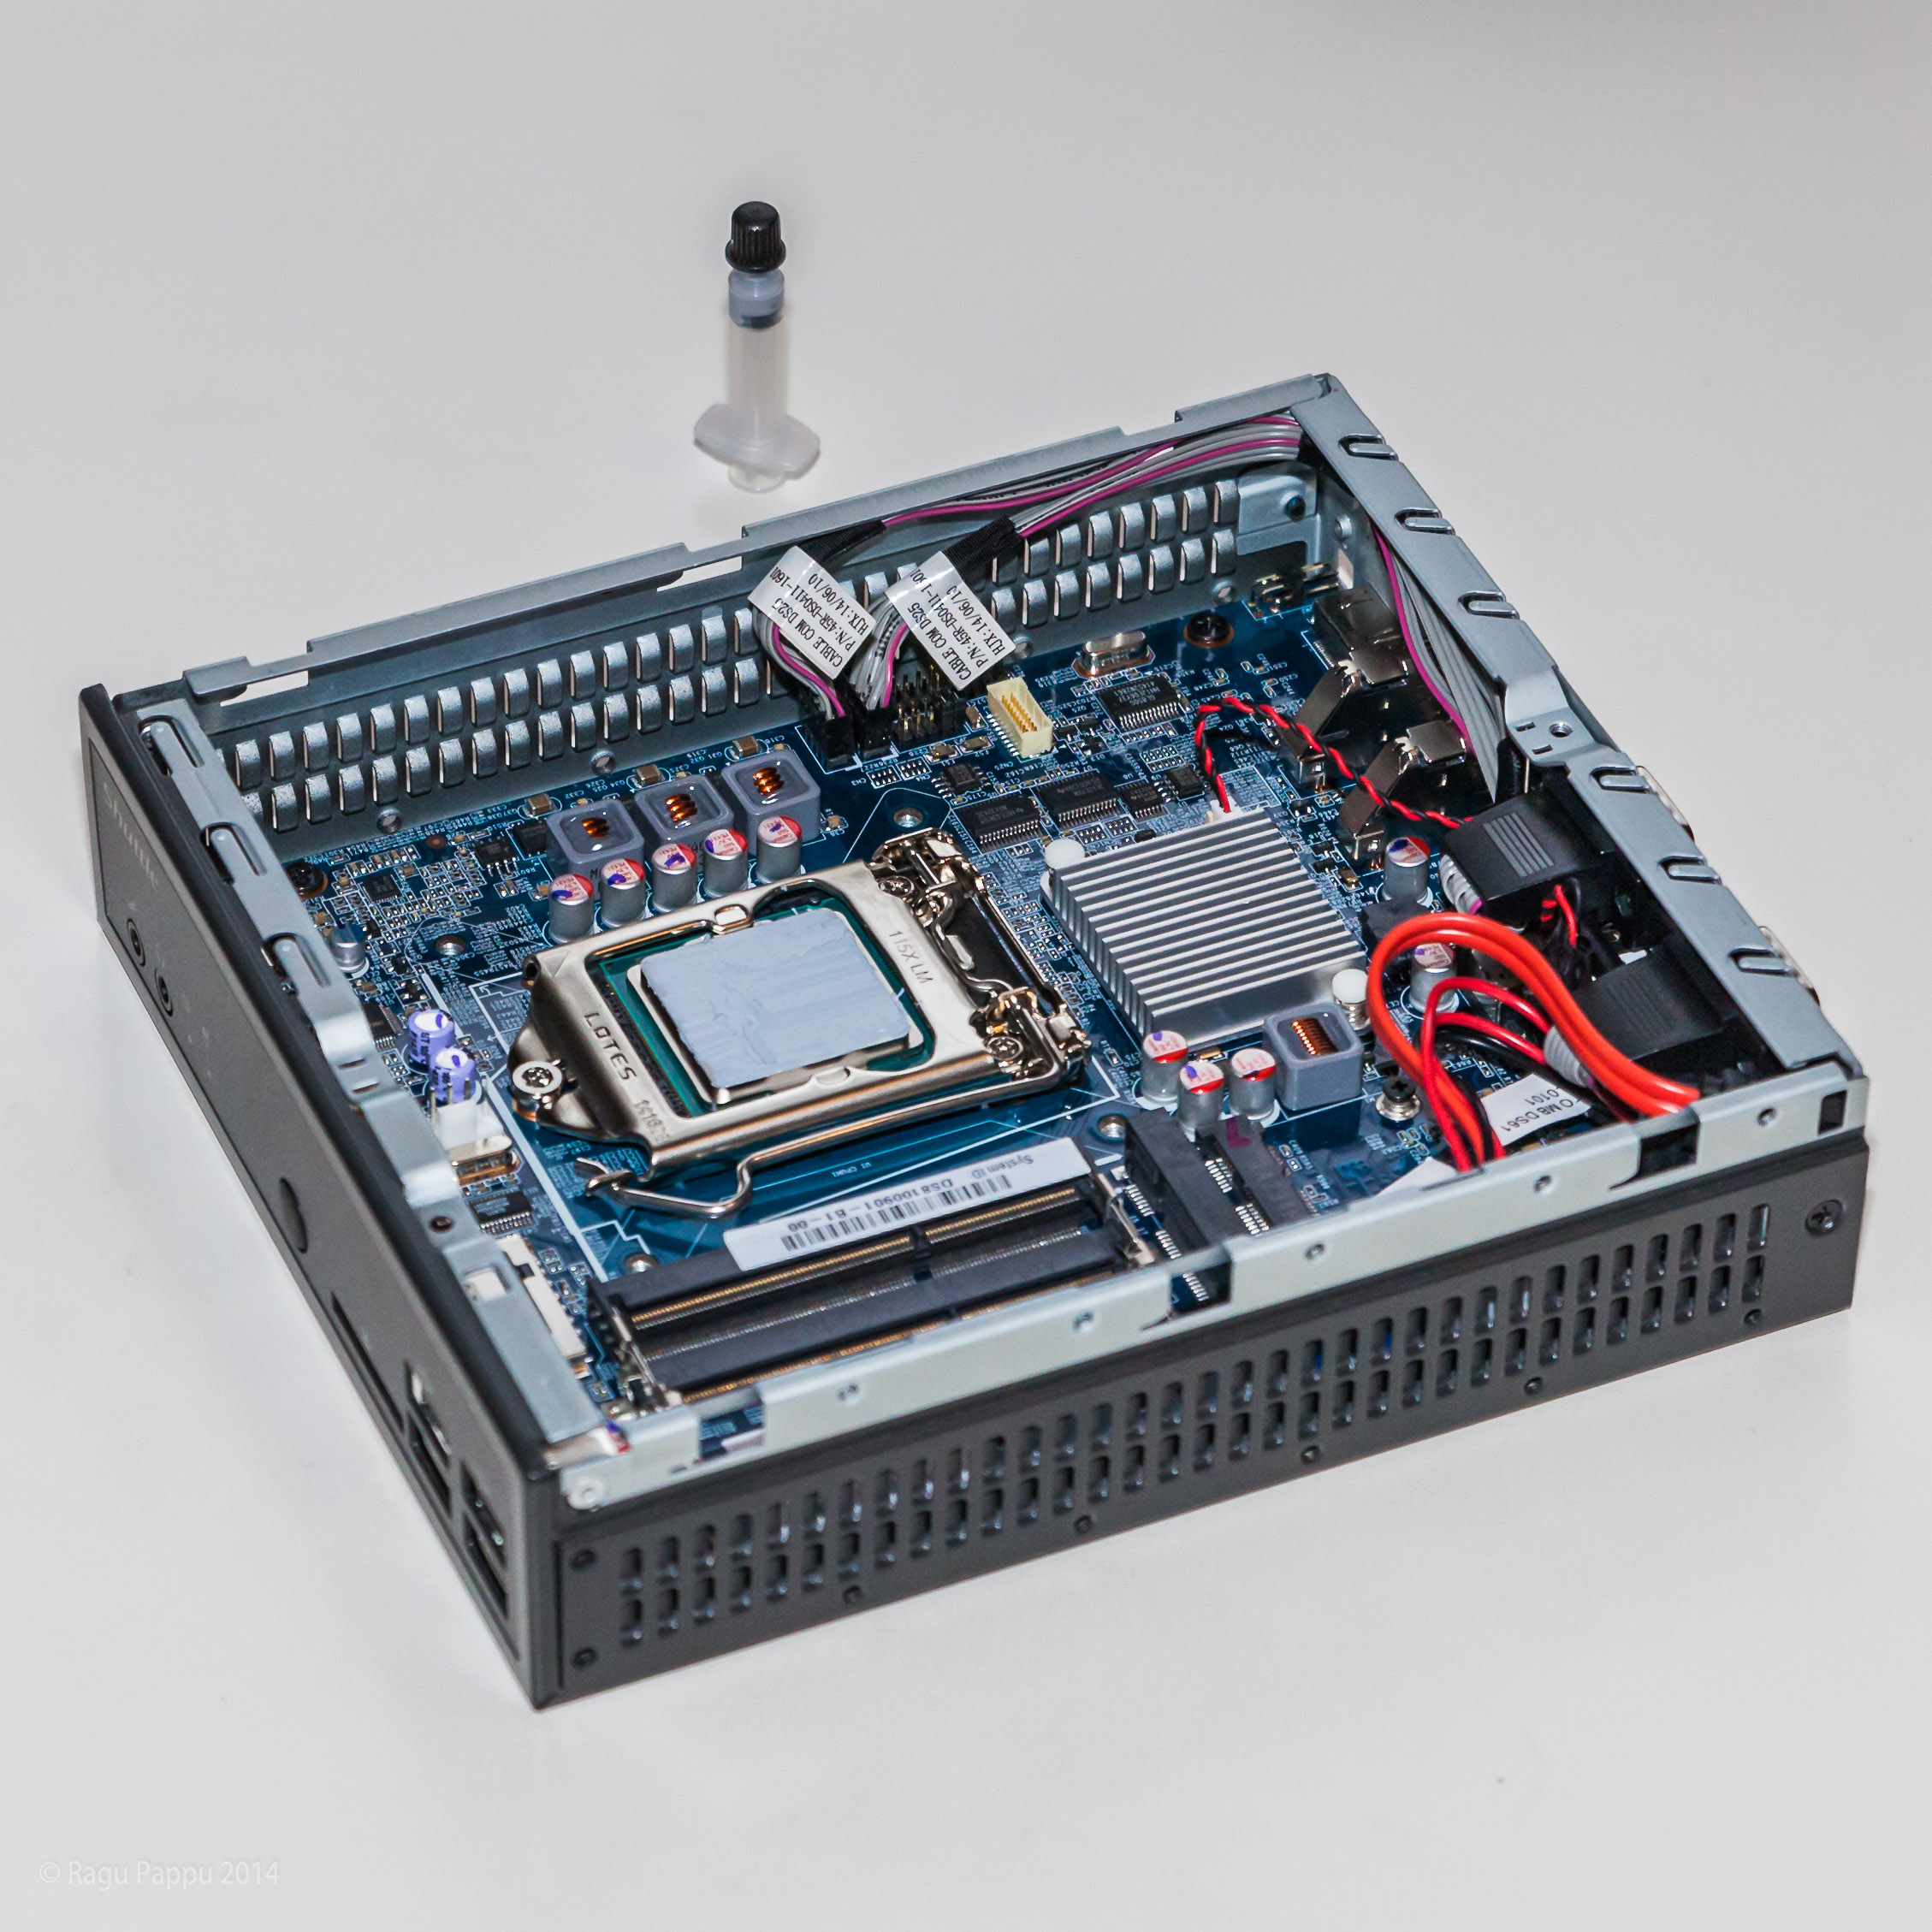
The last CPU assembly step was to put back the ICE module. I carried out this step within ~2 minutes of applying the thermal paste, before it dried out. This last step was a bit tricky because the ICE module uses spring-loaded screws and also because the copper surface of the ICE module that lays over the CPU tended to slip sideways on the still-fluid thermal paste. Once the first screw was in place, however, the other two screws went in easily and ICE module attached firmly.
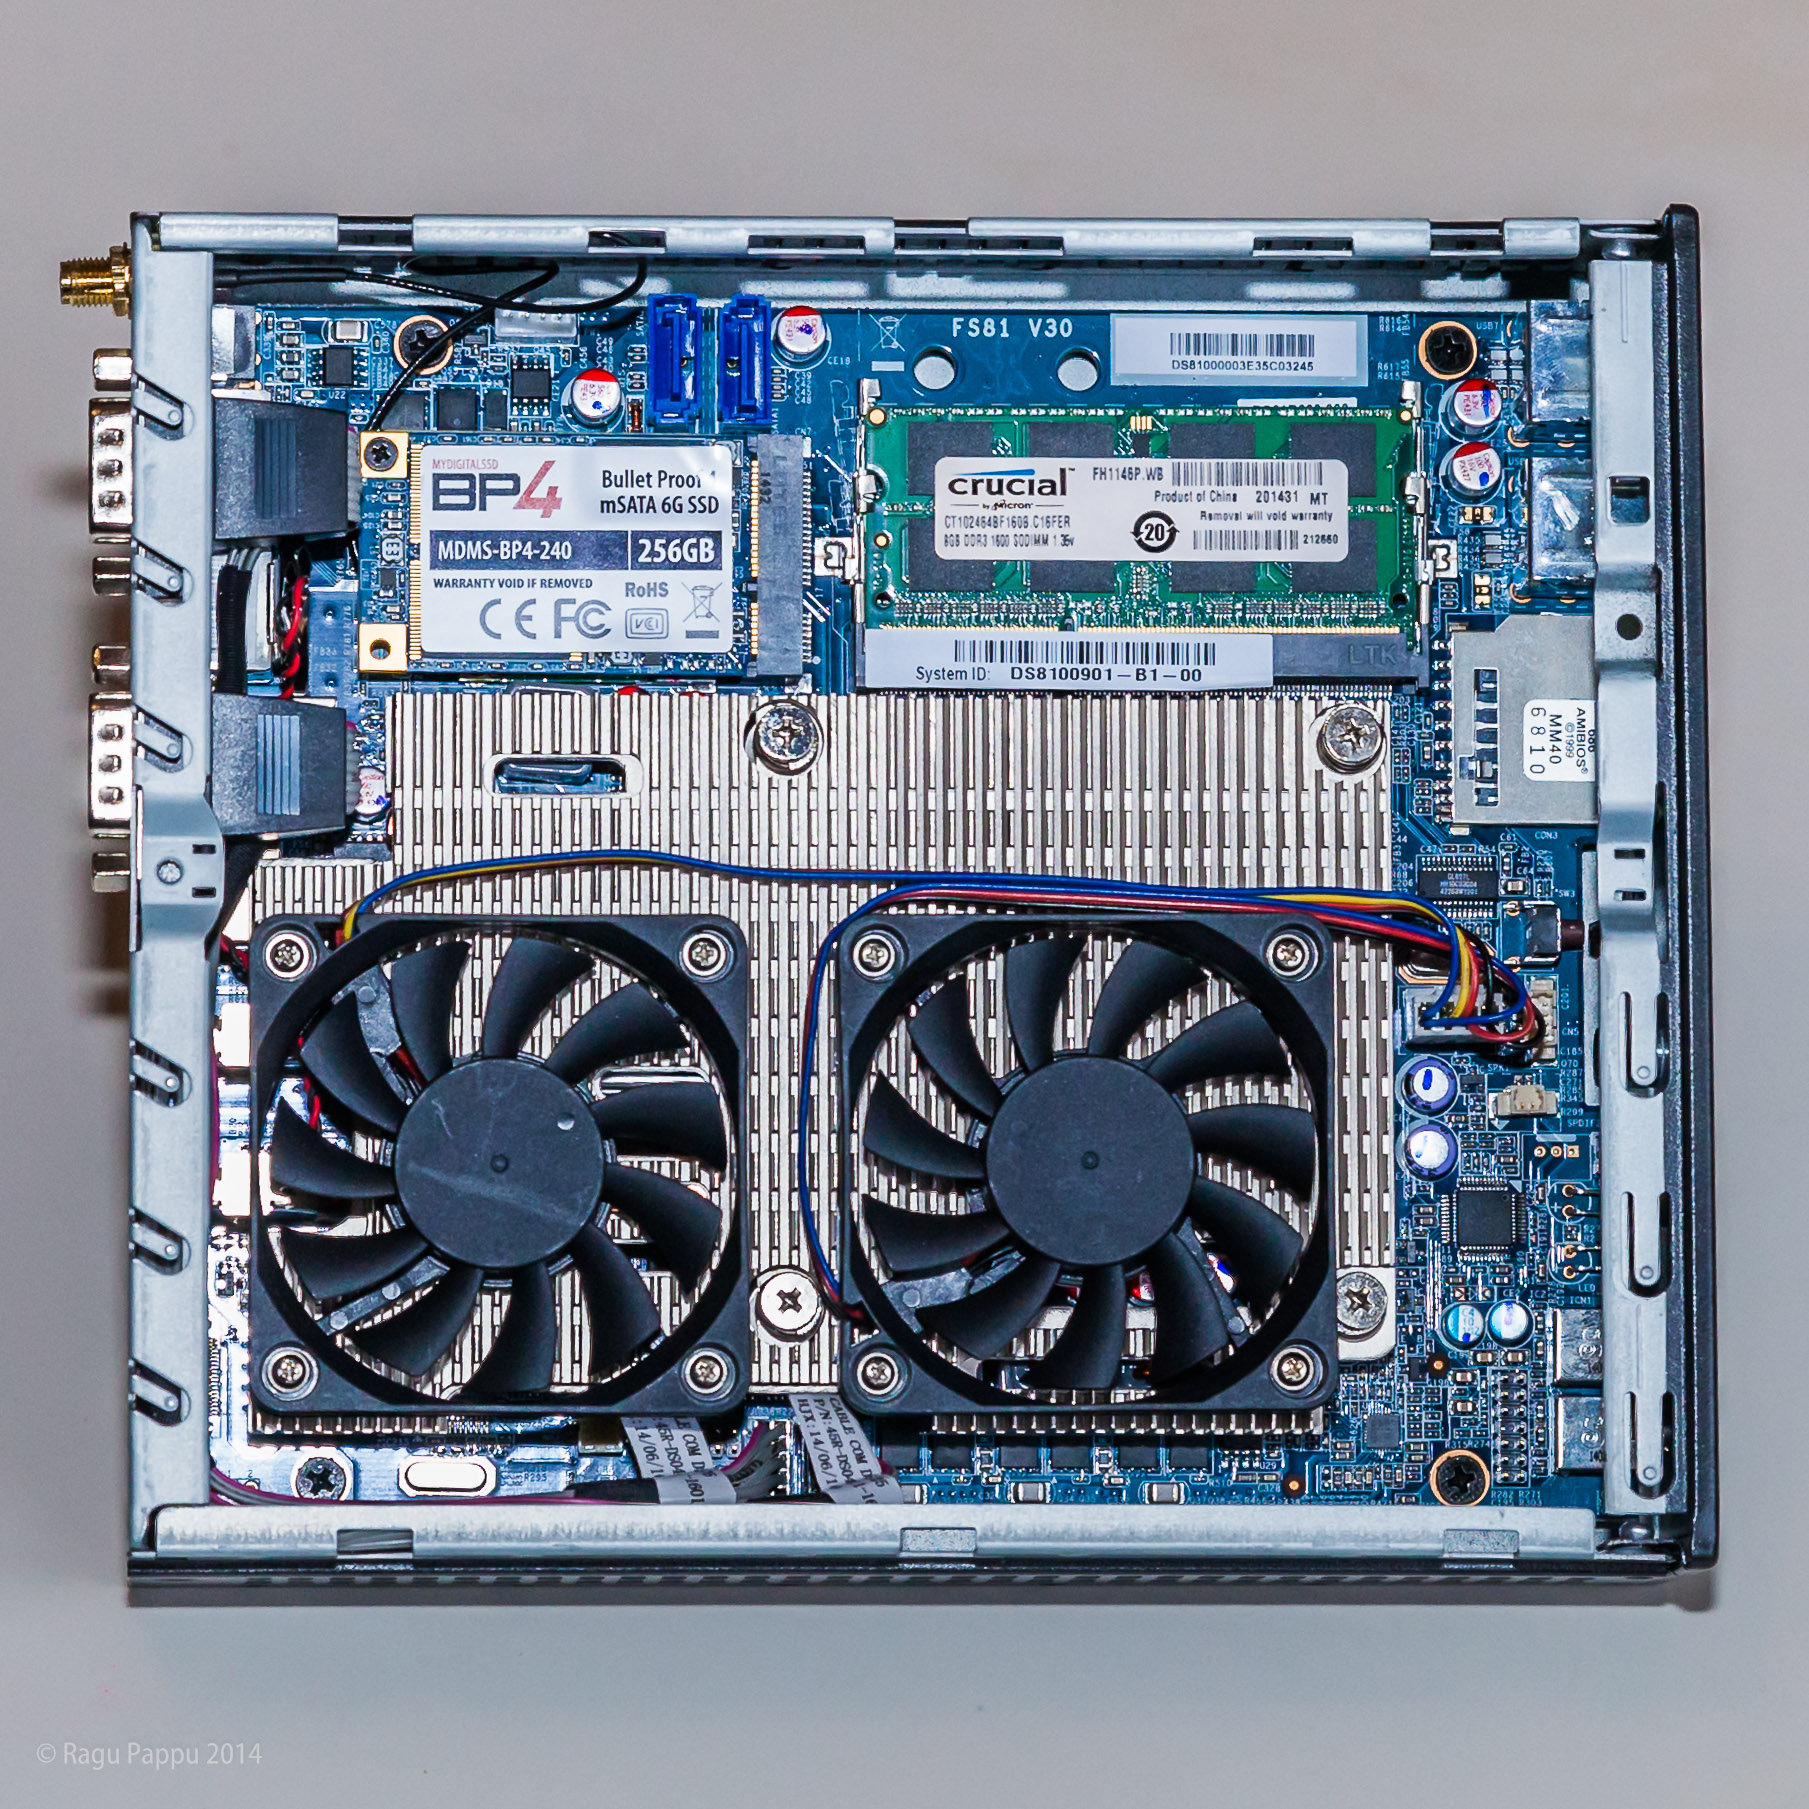
Next I installed RAM. I inserted the 8GB RAM module into the SODIMM slot nearest to the CPU socket lever. The second (empty) slot could be used for adding another 8GB of RAM in the future.
Next I installed the half-PCIe Wireless LAN card. This card went into the lower of the two PCIe slots. After securing the card with a screw (provided on the motherboard itself) I started installing the Wireless antenna but it turned out to be a challenge because there was little room for fingers in that region of the DS81 box. To make room I unmounted the Wireless LAN card and disconnected two connector cables near the PCIe slots. I removed the right metal cutout for the antenna on the back of DS81 using a flat-blade screwdriver by pushing hard on the cutout. And as I set about inserting the antenna screw connector I discovered that the cutout hole was a tad too small for the connector. I remedied the problem by pushing the screwdriver into the cutout hole and giving it 3-4 turns to shave off some metal. The hole was now a bit bigger and the antenna connector went through easily and I was able to install the antenna kit. I re-installed the LAN card, screwed it in, and pressed in the connector of the antenna cable onto the connector marked 1 on the Wireless LAN card. My antenna kit had only one antenna but a second one could be added if desired.
Finally, I installed the SSD card into the PCIe slot. Because there was no internal hard-disk drive (HDD) I simply fastened the rack and completed the installation by replacing the cover and refastening the screws. The desktop PC was now ready for an Operating System (OS).
Installing the OS and Configuring BIOS
I wanted a Linux-based PC and decided to install Ubuntu OS. As of this writing the stable release is Ubuntu 14.04.1 LTS. I prepared for the Ubuntu OS installation by running through the following steps on my Windows 7 laptop to create a bootable USB stick:
- Downloaded the 64-bit ISO file, ubuntu-14.04.1-desktop-amd64.iso from Ubuntu, and saved it into the Downloads folder.
- Inserted an available, empty 32GB USB stick into the laptop USB port. Any capacity USB stick will work as long as it has a minimum 2GB of free space.
- Followed these instructions on How to Create a Bootable USB stick on Windows.
After completing the above steps the bootable USB stick was ready to help install Ubuntu on the DS81 PC. But first the DS81 needed to be powered up and the BIOS configuration changed suitably.
I connected the USB keys of the wireless keyboard and mouse to the two USB 2.0 ports on the back of DS81 and plugged in the HDMI cable from the monitor into HDMI output on the back of DS81, and powered up the DS81. As the computer started up, I pressed the Esc key to get into the BIOS settings screen. [Note: The computer powers up quickly, so if you miss hitting the key within the short time window, press Ctrl-Alt-Del simultaneously which will reboot the computer and you can make another attempt to get back into the BIOS settings screen by pressing Esc or Del key.]
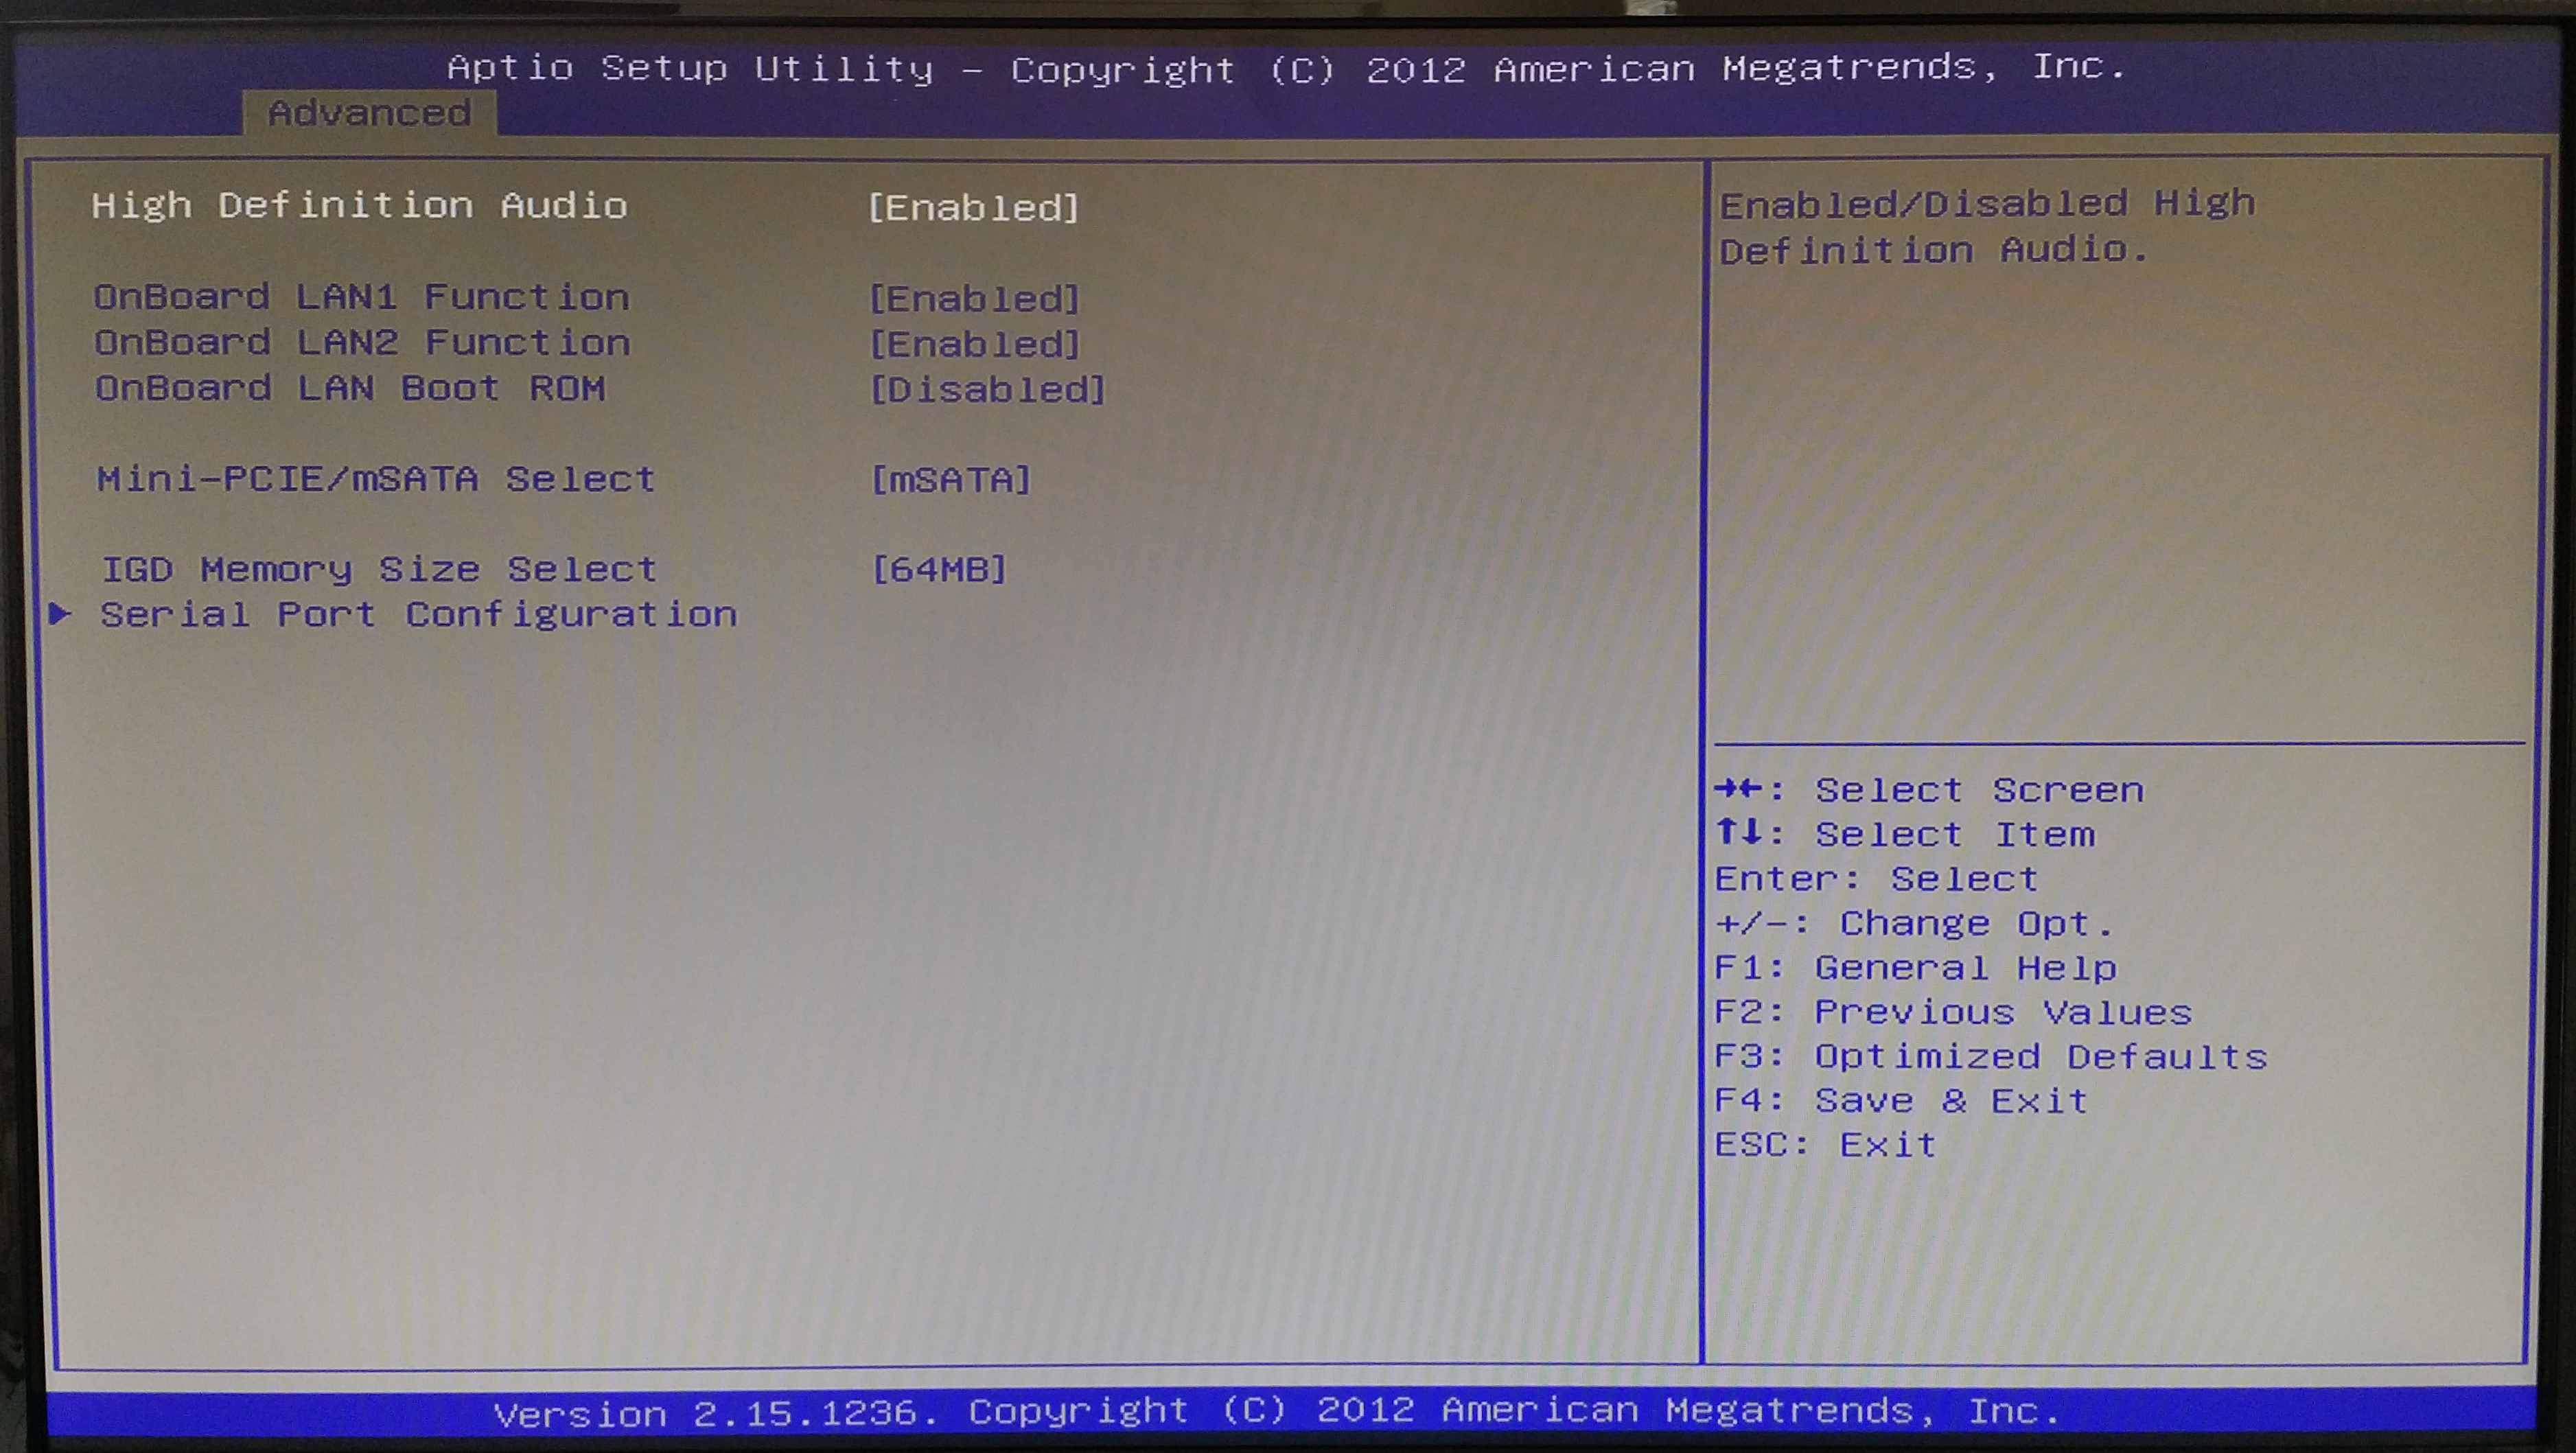
In the BIOS screen I made changes in only two tabs: Advanced and Boot. The images below are screenshots of the Boot tab and the Advanced tab after changes. In the Boot tab, I set up Boot Option #1 to be the bootable USB device (to help set up the OS). Note that in order to be set up as one of the Boot Option devices the bootable USB device must be present in one of the USB ports before the computer is powered up. Next, I selected the internal SSD device as Boot Option #3 (it could also have been set up as Boot Option #2, but I just set it up as option #3). In the Advanced tab, I changed the setting under mini-PCIe/mSATA Select to mSATA.
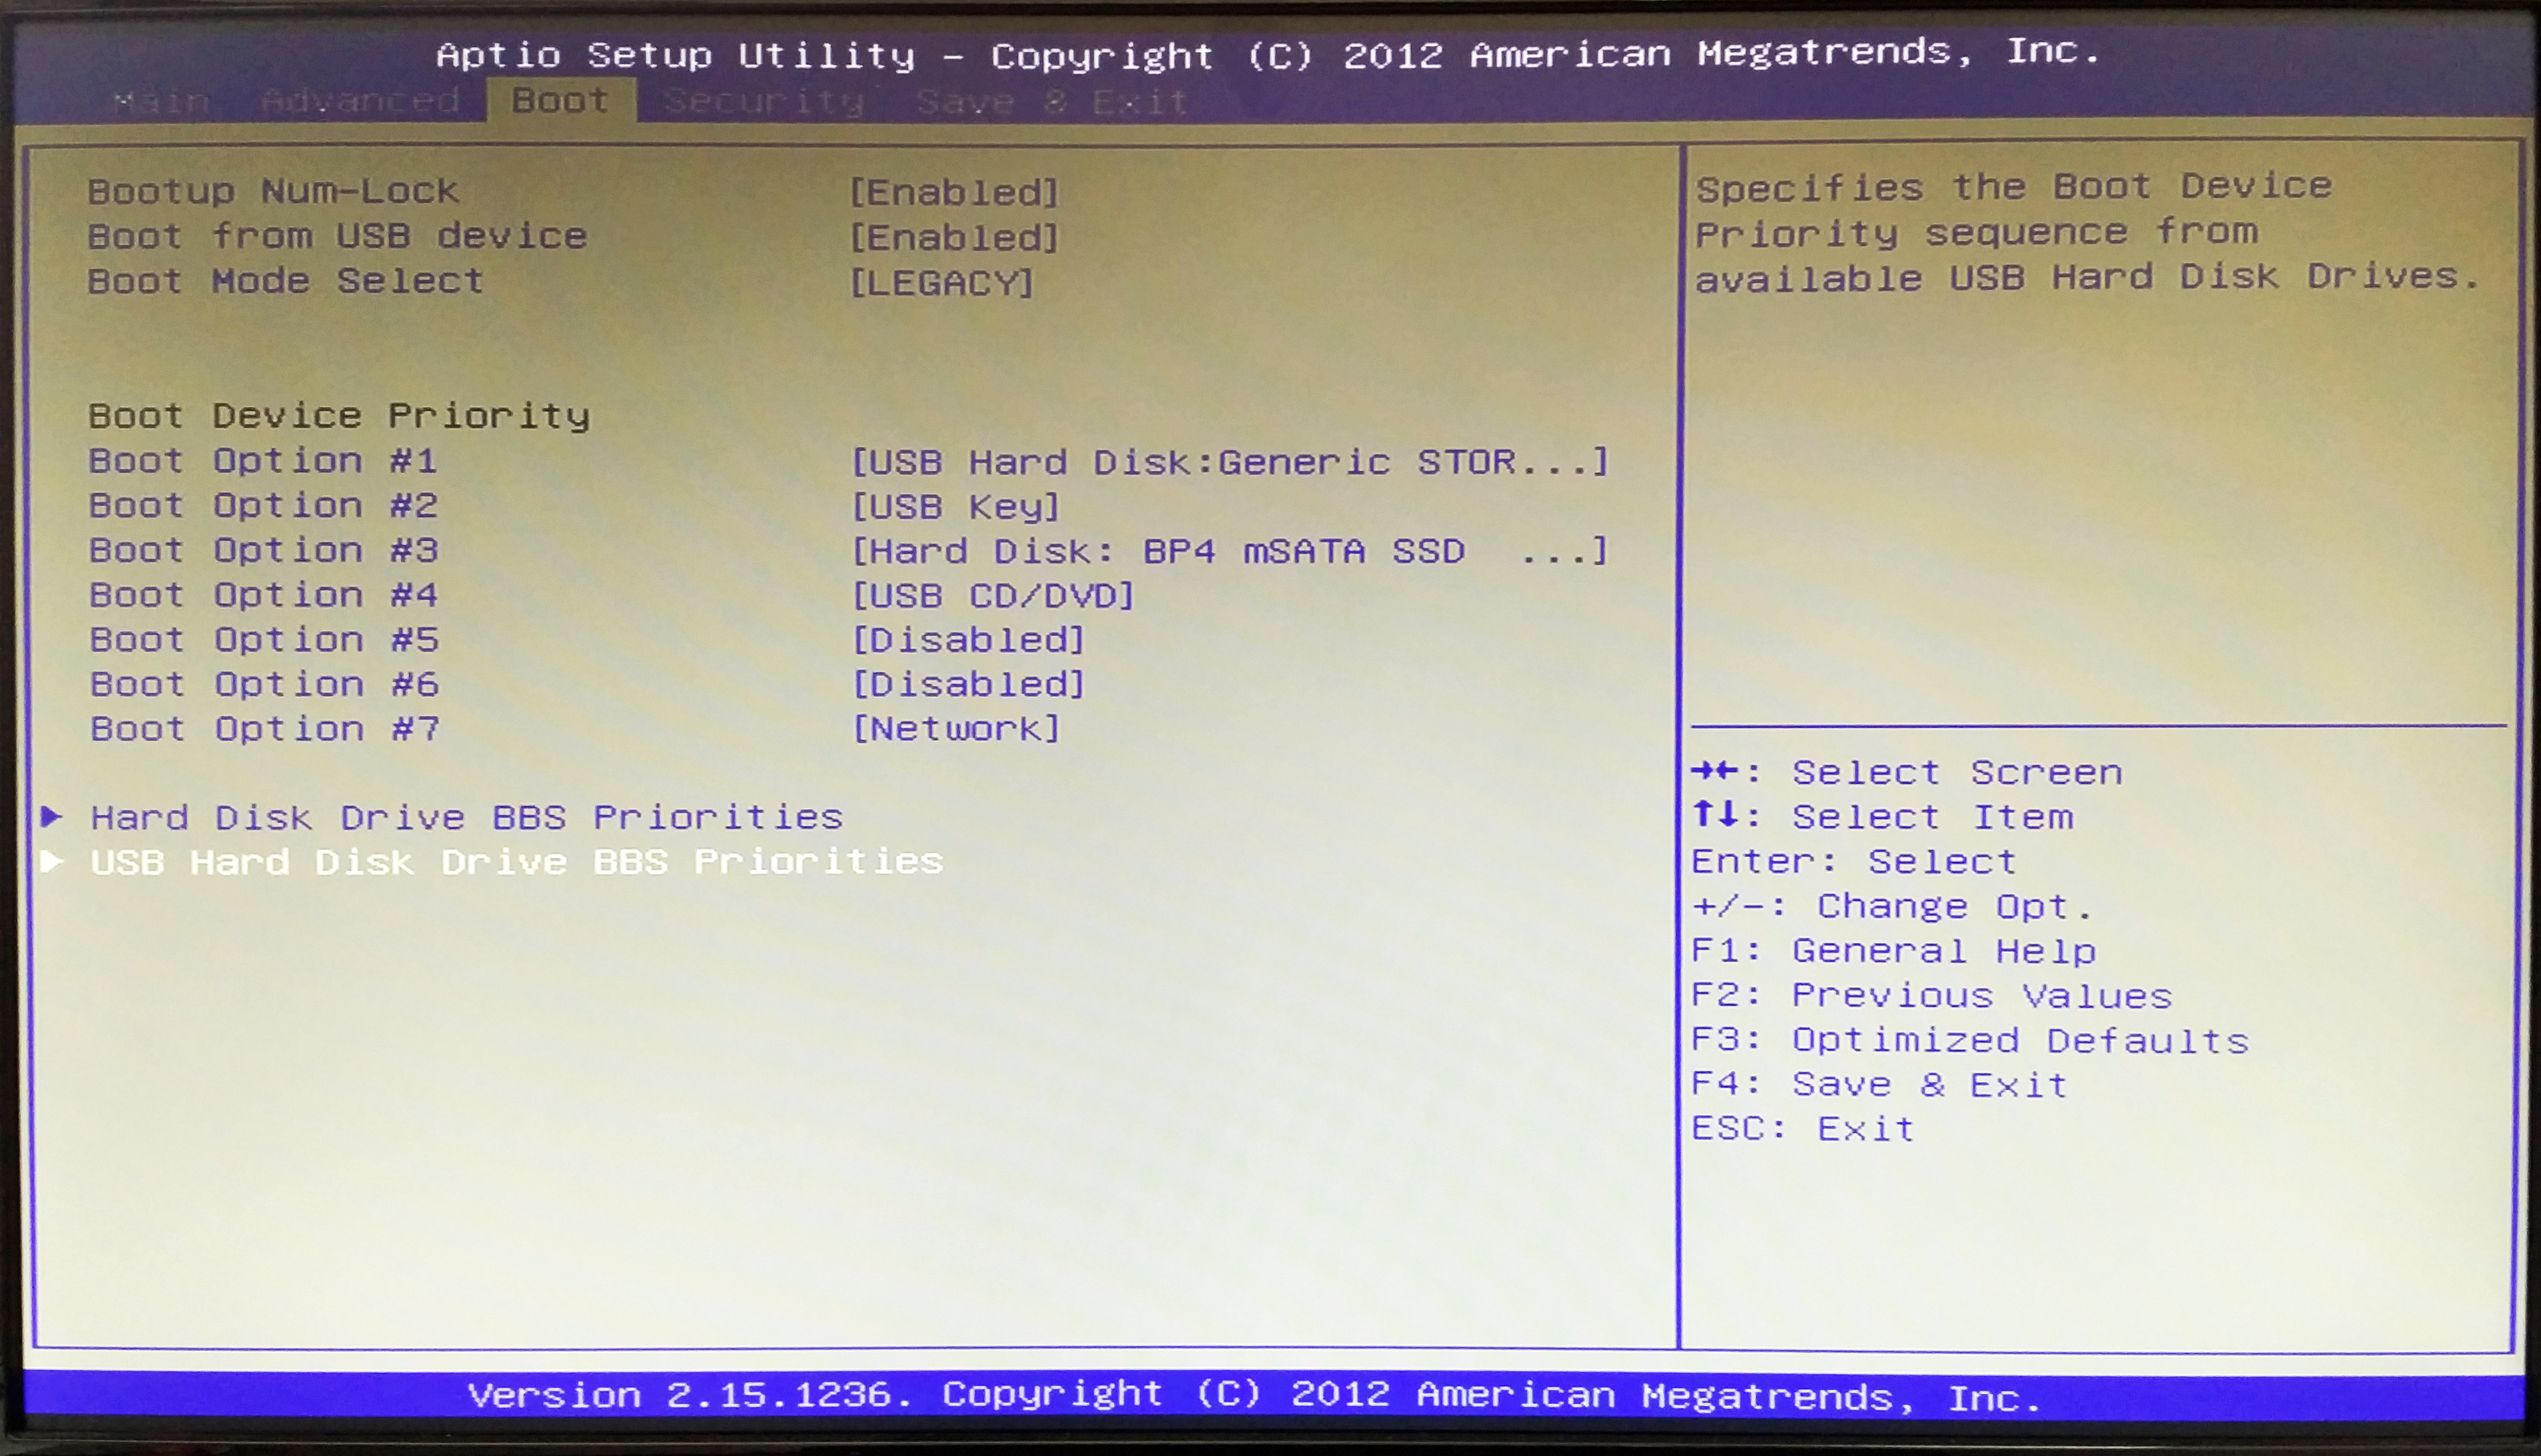
After making the BIOS configuration changes, I saved the changes and exited (hit key F4), and rebooted the computer by pressing Ctrl-Alt-Del simultaneously (alternatively, you can also press the DS81 Power-On button). The DS81 booted from the bootable USB stick and I followed these excellent instructions on the Ubuntu website to install Ubuntu on to the SSD inside the DS81. I did not need to install any drivers for the Wireless LAN card, as I discovered during the OS installation -- the Wireless card came up and connected without issues to my home wireless network. The OS installation completed successfully and my DIY desktop PC was ready for use!
Update (15 December 2014): I came across the excellent Easy Linux tips project website while searching for some Linux information. It has a section titled 'Right after the installation' which contains links to Ubintu OS tweaks, including topics such as Round off Ubuntu 14.04 neatly: do this first, Speed up your Ubuntu!, and so on. I ran through the steps listed at those links and highly recommend them -- they will improve system performance and, for systems with SSD(s), longevity of the drive(s). Depending on your system and software setup you may not need to run all of the steps of course, but it will take between 40 minutes and 2 hours to cover all the sections, so plan accordingly.
Conclusion
This was my first DIY build-a-PC project and I thoroughly enjoyed doing it. Researching the PC form factor and the PC parts and making decisions to select from among several options was a lot of fun. The web is a fantastic resource with countless product reviews, detailed instructions, and helpful community forums, and I would be remiss to not acknowledge the many, many people that helped indirectly to make this project feasible and smooth-sailing. And I am thankful to my family for constant encouragement and support.
Research for this DIY project took about 24 hours, spread over a week. Assembling the PC and installing the OS took about 6 hours, including the time to document build steps (taking notes and photos) and figure out ways around a couple of minor problems during assembly and software installation. The PC cost a bit more than I would have liked to spend but I expect it will serve me well for a long time into the future given what I consider are its 'premier' specs. The PC runs very quiet, I can barely hear the CPU fan.
Overall, it was a fun and joyful project, one that helped me learn a few things, and one I would gladly do again.